Pages

Saturday, January 28, 2012

iNavX, A Fresh Look at an Affordable Chartplotter


There is a multitude of sites through Google search which give excellent reviews and information about iNavX. Search and see for yourselves; but I'll place a few here; and there are links in the following information.
Try iNavX Review which has some great video tutorials.
Take a look at i-Marine Apps for their "Getting Started with iNavX.
And then take a look at the iPad holders from Zacor. And this waterproof casing here.
Finally link it all together with your electronics with an iMux as alluded to in a former blog or have it as a stand alone product with its own GPS from Badelf.

Here is a snopsis from iNavX themselves.......
iNavX™ brings the freely available, official and up to date NOAA RNC raster United States waters marine charts to your iPhone, iPod touch and iPad. Included detailed chart coverage: West Coast, Gulf Coast, East Coast, Great Lakes, Alaska, Hawaii, and US Virgin Islands.
One app for all your devices with access to thousands of charts and maps: official CHS Canada charts, Navionics Gold charts, Fish'N'Chip charts, HotMaps, NV. Verlag charts, Hilton's Fishing charts, TRAK Canada lakes fishing maps and Solteknik European waters charts may be purchased separately from X-Traverse.
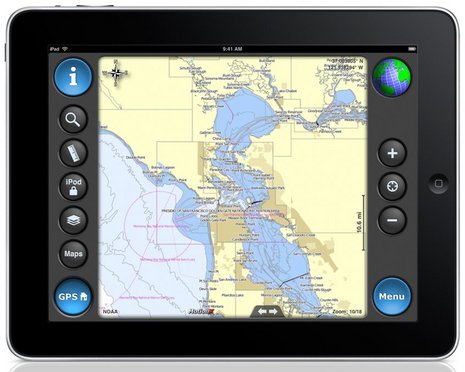
With iNavX™ you can use the built in location services (i.e. GPS, cell tower, WiFi) to plot your position in real-time on the multi-touch scrolling and zooming and rotating (including course up) marine chart.
Using the iPhone's, iPod touch's and iPad's WiFi connection, iNavX™ can act as a repeater for popular marine navigation software that supports NMEA data over TCP/IP such as MacENC and Coastal Explorer. This includes GPS, AIS receivers & transponders, and Instruments (Depth, Speed, Wind, etc.)
In addition to real-time chart plotting and printing, iNavX™ supports waypoints & routes including KML (Google Earth) and GPX import/export, track log, measuring bearing/distance, GRIB weather forecast, tides/currents, anchor alarm, graphic instrumentation display and port/navaid search.
The power of a color chartplotter for a fraction of the cost.
iNavX_iPad___iPhone.JPG
And Boaters.Com has this to say.....
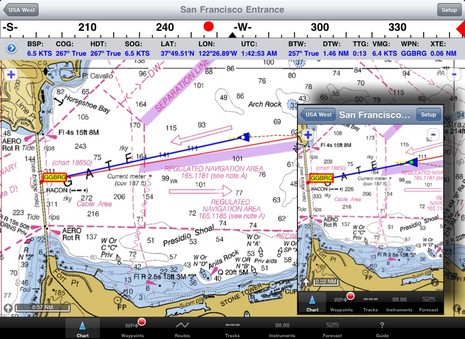
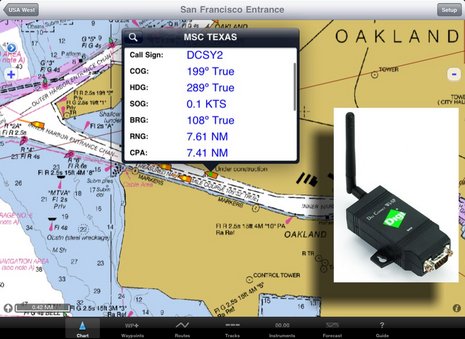
In fact, the iNavX web site now boasts "The power of a color chartplotter for a fraction of the cost" and, while I'll stay out of that argument for the time being, developer Rich Ray does make a good case for how far he's taken the software, and how able it looks on the bigger iPad.  Note, for instance, the series of screen shots comparing iNavX iPhone and iPad versions.  Ray has also gotten his program to play nicely with a Digi Connect WI-SP WiFi serial server, which means you can get AIS and other NMEA 0183 data flowing to your iThing without any other computer involved (and he even added a Digi Connect guide to his extensive help files).

iNavX_iPad_with_Digi-Connect_WI-SP.JPGAnd if you want to use your spiffy iNavX/iPad combo with anything but free NOAA raster charts, you'll be pleased to know that X-Traverse keeps growing its already giant cartography portfolio, and adding to what the service can do (new Facebook integration, for instance, plus integration with Navionics NavPlanner 2).  When you purchase charts via X-Traverse you get two activations, so if you're already using them on, say, an iPhone but haven't activated them with a PC or Mac, you're probably good to go if you get an iPad.  The exception:  Navionics is pricing its iPad charts differently -- understandable, I think, given how inexpensive their iPhone charts are, and their many partnerships with companies that manufacture those old time chartplotter things -- though $50 for the new U.S. super region is not bad.  That region includes the Northern Bahamas, by the way, but below is a sample of alternate NV charts of the same area, also offered by X-Traverse.  Choices are good.  And I'm not done...
iPad_iNavX_NVDigital.JPG
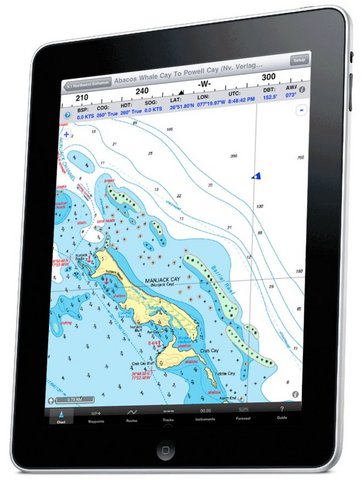
Navimatics has not only adapted its Charts & Tides program for the iPad, but expanded the included regions of NOAA ENC charts, lowered the price, and is just about to add support for ActiveCaptain!  The implementation looks good on an iPad, too, as you can see below.  As with MaxSea TimeZero 1.9 (just about to release!) and the Coastal Explorer 2010 beta, the ActiveCaptain data is cached so you still have it when not connected to the Internet.  And we know Active Captain itself is also working on an iPad app.  Damn.

Navimatics_Charts_with_Active_Captain_cPanbo.JPG
Panbo_iPhone_marine_app_collection.JPGi-Marine Apps tells us how to get additional charts through X-Traverse

If you want additional charts other than the free NOAA charts you can purchase these through X-Traverse. This process is complicated, so follow below.

You will need an X-Traverse account to purchase and access your charts. This account will cost you $10.00 per year and allows you access to your charts through the iNavX app. Access to Grib weather files and transfer of waypoints and tracks can also be done through your account. 

Once you have your X-Traverse account you can then purchase additional charts. Make sure you purchase the iPad charts for download. They offer a wide range of Navionics, CHS Canadian Charts, Fish"N"Chips, HotMaps, NV Verlag and Hilton fishing charts.

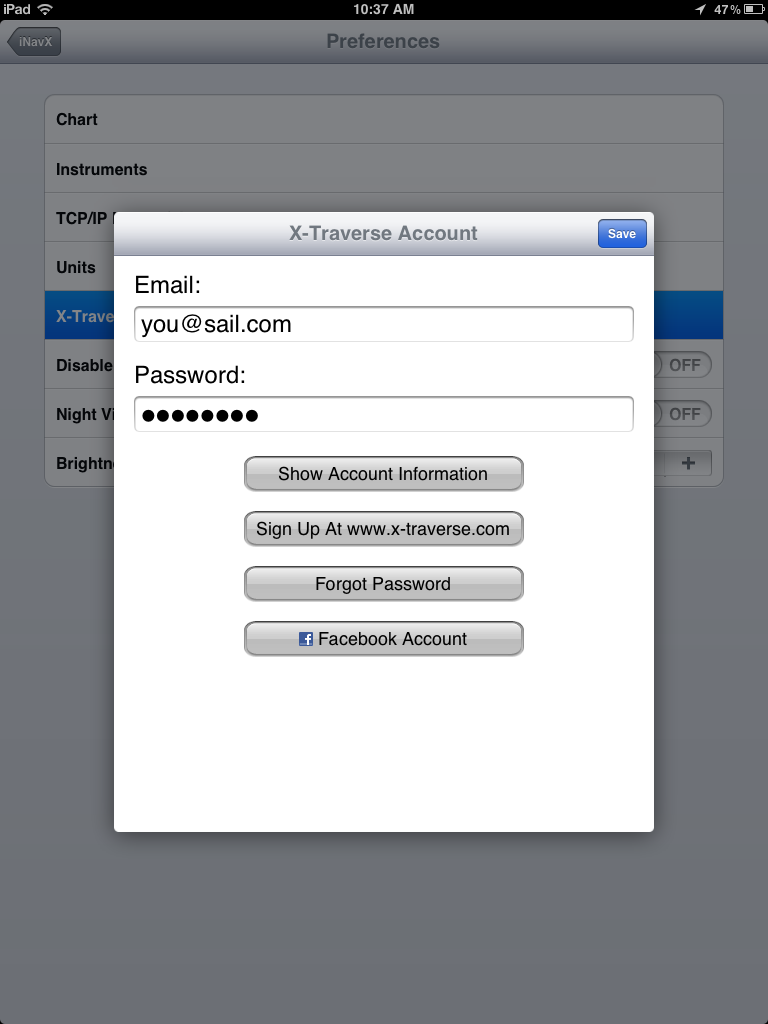
To access and download your purchased charts in your iNavX app you need to add your X-Traverse account information to the app. Go to "Preferences" and select "X-Traverse Account". This is where you will add your email and password for your account.

Next select "Show Account Information" this will retrieve your account info showing you what products you have activated for use by the iNavX app.
You will next need to go back to the Charts list and select "Add More Charts to Menu". The next menu should show you the list of charts. The charts you purchased should show up as bolded. I purchased Navionics Gold Marine Charts 2011.  Select this and another display will show the charts in that package. Turn "ON" the charts you purchased.

Go back to the iNavX menu and select the chart you turned on to view you charts. Select your chart title and download you your iPad.

motionx-gps-hd-launch.JPG

Friday, January 27, 2012

A Quick an Easy Way to Do Your Own Rigging

Most sail boat owners at some time or another are faced with having to have their standing rigging replaced. For some, it's a question of can I do this myself. One of the inventions which has potentially made this possible is swageless fittings, However, even some of them require some skill, as most require unraveling the outer wire strands and getting them evenly spaced before the final assembly. You can see the Norseman fitting in the middle of this blog to compare with Suncor fittings. To me, the Norseman seems way more "fiddly" to assemble. To help you make an informed choice here is what Bosun Supplies had to say with their test of Suncor fittings.


It was said that after having rerigged my boat I was not sure it had been cost-effective to do it myself. I reasoned that, between the cost of the tools I bought and the cost of the swageless fitting I ruined (by getting a wire pinched between the upper and lower terminal and stripping the threads), I was close to the cost of having the job done by a professional rigger.
That opinion was based, to a large extent, on how time-consuming and difficult it was to assemble the swageless fittings I used.
Recently, I was  asked to evaluate another fitting manufactured by a Danish company called Blue Wave. I wasn’t aware of this fitting when I rerigged my boat. The new fitting promised to be much easier to use. So easy, in fact, that I had reservations about its ability to match the full strength of the wire.
Suncor Stainless is the sole importer of this part and collaborated on its engineering and development. They supplied a sample fitting and a length of 3/16-inch stainless-steel wire. The fitting looked first class. In fact, it appeared to be the most robust casting of all the swageless fittings on the market. It was easy to install because the wire does not have to be unlaid. There is no cone to be inserted, and there is no bending of the wire over the cone. Total assembly time was under one minute. Very impressive. But was it strong enough?

To conduct a fair test, I purchased a length of 3/16-inch, 316 stainless-steel, 1 x 19 rigging wire sufficient for several tests. I could cut the wire into pieces for each sample test. Each section of wire, therefore, would be the same. I also obtained equivalent-sized fittings from two other manufacturers who supply swageless fittings. The variable would be the fittings.
In a test of this type of assembly, it’s expected that the wire will be the part that fails. It is also expected that the terminal will not weaken the wire where it’s attached to the terminal. The wire used in the test has a breaking strength of 4,000 pounds, so that was the ultimate test goal.


Overkill
Quality Testing Inc., has all the required equipment, fully certified, to pull a load of up to 120,000 pounds of force on a sample. A little overkill for my needs, perhaps, but they agreed to do the tests.
One problem we discussed was how to secure the standing part of the wire so we did not pointload one small section of wire. The solution was to build a loop in the wire with two Nicopress compression fittings and a stainless-steel wire clamp backup. A three-inch, heavy-wall piece of pipe was slid through the loop and formed the top secure point of the standing part of the wire.
To secure the fitting to the test stand, we machined a piece of steel plate with a hole in it to receive the pin of the fork from the fitting. I had to make up a swage fitting on another section of the same wire so we could test it, along with the other two fittings, as a part of the baseline.
The fittings were ready, and the lab was all set. The first fitting to be tested was the "baseline" swage fitting. One of the functions of the test machine is to monitor and record the loads as they are applied to the test specimen. If you look at the first graph (Test 1), you will see that the swage fitting held onto the wire to a peak load of 4,112 pounds before slipping. The wire did not break; it pulled out of the fitting. This was a successful test as the wire breaking strength was rated at 4,000 pounds, and the fitting exceeded that load. The other two fittings were tested to verify the baseline. One test was satisfactory, and one tested well below the braking strength of the wire (This terminal brand was retested at a later time with an assembly made up by the supplier. It also failed the second test.)

Held the Load
The new Suncor fitting was next in line. The graph (Test 4) for fitting number four shows that the Suncor fitting held the load all the way to 4,278 pounds, 166 pounds higher than the swage fitting. This assembly also successfully passed the test. Not only that, but the outer strands of the wire actually broke, leaving the inner core of the wire attached to the fitting. I do not think the inner core would support too much load, but it did stay together. This was true of one other type of swageless fitting we tested as part of establishing the baseline.
 The Suncor fittings have some qualifiers that must be observed. They should be used only with the specific size of wire for which they are made – and they are not made for all sizes of wire. The 9/32-inch Dyform wire on my boat does not have a corresponding fitting from Suncor. The closest is 5/16-inch, so I could not have used these fitting with the wire I chose. It is imperative that the directions be followed carefully as to the length of wire to protrude above the inner wedge and pressure ring. Other than that, the fitting is easy to use and has proven itself under a verified load.


Norseman Comparison.


What does all this mean? -by Jerry Powlas

When asked to evaluate the Suncor terminal we half expected him to say, "It’s too easy to be true." He could simply have presumed that these things worked as claimed, but he’s a cynic. He has had his share of surprises with rigging terminals. So he ran tests.

To provide a proper baseline for the test, he tested the two other swageless terminals he knew of, Norseman and Sta-Lok, as well as a C. Sherman Johnson Co. swaged terminal, with the swaged wire assembly professionally made.

The swaged terminal, as well as the Sta-Lok and the Suncor swageless terminals, passed the initial round of tests by breaking at a load slightly in excess of the wire’s rated ultimate breaking strength.. The Norseman terminal failed at 69 percent of the wire’s rated ultimate breaking strength. When the supplier was contacted concerning this, they offered to supply another terminal and wire assembly made up by their own staff. This terminal and wire assembly also failed the test, breaking at 80 percent of the rated breaking strength of the wire.

There are very narrow limits to what can be inferred from testing only one sample assembly of each terminal (or in the one case, two samples). Many samples of each terminal would need to be tested to make definitive statements about the performance of these parts. At nearly $100 a test sample, we were not inclined to do that, although we hope the manufacturers of these critical parts are no inclined.

Not significant
Respecting these narrow limits, it should be said that the differences in the ultimate breaking strength of these assemblies (the highest load before failure) are not significant in the case of the three assemblies that had ultimate strengths higher than the wire rating. If the terminal functions properly, the test becomes a test of the breaking strength of the wire, not the terminal. This is true even in cases where the wire deforms and pulls out of the terminal without breaking.

In the cases of the two Norseman terminal-and-wire assemblies that failed to reach the breaking strength of the wire, many explanations are possible. Without more evidence (more testing to achieve statistical significance and professional engineering evaluation of the failures), it is not fair to speculate.

One of the appeals of swageless terminals is that they do not require a (very expensive) swaging machine, so they allow the boatowner the opportunity to do this job personally. If spare wire and terminals are carried, it’s even possible for the owner to make repairs in remote ports, or in a worst case, at sea.

There are many critical attributes to a swageless rigging terminal. It must be consistently strong, corrosion-resistant, and affordable. If it’s to be offered for use by amateurs, it must also be easy to use, so that the liklihood of proper and satisfactory assembly is extremely high. We tested only a few samples, so our opinion must be tentative, but this evaluation certainly suggests that the Suncor terminal is extremely easy to use. Bill considered the Sta-Lok terminal easier to use than the Norseman terminal. In at least some instances, the Norseman terminals may not be able to allow the full strength of the wire to be utilized.

Thursday, January 26, 2012

Backing up a Chain Plate

Capt'n Pauley's Virtual Board Yard has shown us how he backed up his chain plate. This is in a similar vein to the backing up I did on Solace for my forstay installation. In my case the forstay padeye had no support at the deck and so I installed a small bulkhead in the chain locker and put two stays from the padeye down to the bulkhead. You can read about that here. For Capt'n Pauley's article, read on.....


CC-06
The aft chain plates on my Columbia 10.7 had a problem; the tabbing on the hanging locker had broken, allowing the shroud to poll up the chain plate and crack the deck. That allowed water to leak into the deck core, weakening it.
Before I could re-core the deck, I had to off-load the chain plate and hanging locker. I accomplished this by yying the bottom of the chain plate ( a stock Schaefer part) to the lower srtinger by means of a cable and turnbuckle. The following photos show how I did it. CC-01
I used a 24" length of 1-1.2" x 1-1/2" sainless steel angle underneath the stringer. The forged eye bolt passed through this angle. I also filled in either side of the eyebolt with wooden filler blocks, then laminated 6 layers of fiberglass cloth and epoxy. The fiberglass strips went down the hull, scross the top of the stringer and then down the wood blocks and hull underneath the stringer.
CC-02
A view from above the stringer.
CC-03
The new chain plate in place. This chain plate extends below the locker to connect to the cable stay.
CC-04
A view from below the locker showing the cable connected to the new chain plate.
CC-05
A view showing the cable stay connected to the eyebolt and chain plate.
CC-06
The finished installation. A very minor cut will need to be made to the edge of the berth cushion.

Tuesday, January 24, 2012

Repairing Non-Skid Deck Patterns

If the patterned non-skid on your production-built fiberglass boat needs repair, you may be interested to know flexible molds are available for making professional looking repairs. Gibco Flex-Mold™ produces the non-skid patterns used to mold the non-skid on fiberglass boat molds. They also produce flexible molds designed for repairing existing non-skid patterns used on hundreds of production fiberglass and one-off boats. You can call them to see if they have the pattern you are looking for. If the damage to the deck is more than cosmetic, repair it prior to continuing.
The Flex-Mold is designed to lock into the existing molded pattern on your boat and works best if the pattern has not been painted over. If paint has been applied or if debris has accumulated in the pattern, the fit will be poor at best and the repair will be harder to blend in. Mold release is applied to the Flex-Mold at the factory so epoxy or the polyester gelcoat used to make the repair will not stick to it.

  1. Apply mold release wax to existing non-skid prior to beginning the actual repair. Spread wax well beyond the actual repair because gelcoat will migrate. Use wipe on/wipe off method to apply wax.

  2. Use a router to remove the damaged non-skid. Remove only the thickness of the pattern, no more. If you grind through the opaque white gelcoat or you can see the dark substrate through it, you must then fill the dark low spots with gelcoat so that after molding a new non-skid you do not see the dark laminate through the thinnest, lowest parts of the gelcoat pattern.
    If the damage went beyond the base gelcoat thickness, or you are finishing a structural repair, you will have to router a void to fill with a thick enough layer of gelcoat to make an opaque base for the pattern. This layer of gelcoat is then machined with a shallower pass on the router, to level the opaque layer and establish the base of the non-skid pattern. Break the corner of the routed area with sandpaper.

  3. Position the Flex-Mold over the area to be repaired, moving it around until it locks onto the pattern. Tape one end down securely and roll back the Flex-Mold until the repair area is accessible.

  4. Pour catalyzed gelcoat (you can use epoxy but it will require painting) near the Flex-Mold.

  5. Slowly flex the mold forward while continuously engaging the non-skid pattern. Use a stiff rubber or plastic spreader to uniformly apply pressure to the backside of the Flex-Mold, effectively squeezing out the excess gelcoat. Allow the gelcoat to cure before removing the mold. Clean up excess gelcoat film (surrounding the repair) with an air nozzle or by brushing the area with a stiff bristled brush. When done correctly, the repair will not be detectable.
    If you are interested in doing your own non-skid repairs, contact Gibco Flex-Mold at 817-236-5021 or click here to download their PDF repair process brochure .

Monday, January 23, 2012

Stitch and Glue Pram Dingy. A Weekend Project

Here is a project by Mark Corke, which would only take a couple of weekends to complete. It follows the traditional stitch and glue method  and below is a small extract of his project. The complete article  can be read at  his web site here
snip...
"A kit boat is good introduction to boat building, as little preparatory work is needed before construction commences. You will need some space and typically this will be the family garage but because the boat takes shape so quickly the car will not have to stay outside for more than few days.

The boat is built using what is often called the stitch and glue method, pioneered successfully many years ago by Barry Bucknell and Jack Holt in the mirror dinghy. Now however rather then using polyester resin and glass tape epoxy resin has taken over and is used both as glue and coating material.
 The average reader is likely to have more than enough tools and skill to successfully build this boat but I would strongly recommend building a couple of strong sturdy saw horses on which to work. Make sure that the work area floor is level because it is all too easy to build a twist into the boat. Read the through the instructions several times before you start is a piece of advice that I should have told myself in past construction projects. Reading the plans and instructions that come with any kit will make the project go that much easier.

I mostly followed the manufacturers instructions but where I deviated I did so as either time saving method of work or because experience has taught me that their might be a better way of doing it. Next issue I will be concentrating on painting and varnishing.

Building the Eastport pram took me about 40 hours of building time and this is a reasonable estimate but expect to put as much time in again on the finishing if you want a high quality job." continues.......


The whole project can be read at this link here